Adsense

Tuesday, 31 March 2020

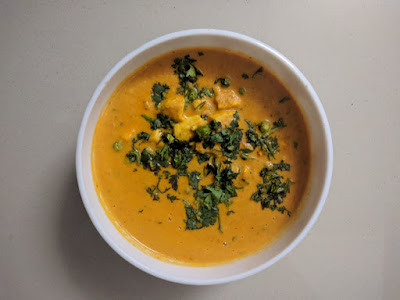
Learn how to make Shahi Paneer in a simple and scrumptious way

This recipe is contributed by Stuti of www.meandmysuitcase.com


Ingredients: 

Set A:
  • 2-3 ts. ghee
  • 1 ts. Cumin seeds
  • 2 teaspoon Coriander powder

Set B:

  • 3-4 garlic cloves
  • 1 teaspoon crushed ginger
  • 3 small onions
  • 8-10 tomatoes
  • 8-10 cashews
Set C: 5-6 teaspoons milk cream


How to make:  


1) Heat pan and add ingredients under A. Saute.
2) After 2 minutes add ingredients from Set B except tomatoes. 
3) Once onions become little translucent, add tomatoes. 
4) Let everything cook on low flame till tomatoes become soft. Then switch off the gas and let the preparation cool down.


5) Now grind the preparation in to fine paste and keep it separately. 

6) While mixing, you can add 2 to 3 teaspoons of cream to it.

7) In pan, add a spoon of ghee, add green chilies cut in half.
8) Also add Paneer cubes, fry light and then add the mixture/paste to it made above.
9) Let it cook and add salt and garam masala at the end.
10) While serving garnish with cream and fresh coriander.

Shahi paneer by Amma Ki Rasoi Blog


Tip: To make it healthier, add boiled peas to it like I did. Enjoy with hot phulka.

Saturday, 28 March 2020

Malpua Malai Hindi Recipe - Amma Ki Rasoi - मालपुआ मलाई के साथ

मालपुआ तो सभी को पसंद होता है लोग बनाते भी है और खाते भी है लेकिन एक बार हमारी तरह बनाकर अवश्य खाइए बहुत ही स्वादिष्ट लगेंगे मैने आज ही माता के भोग के लिए बनाए थे। 


 Amma Ki Rasoi Food blog


सामग्री:

  • दो टेबल स्पून बारीक सूजी 
  • दो टेबल स्पून बेसन 
  • आठ टेबल स्पून गेहूं का आटा 
  • चीनी या गुड़ (आप अगर चीनी का बना रहे है तो पीस ले) 
  • आठ - दस बादाम 
  • आठ - दस किशमिश
  • तीन छोटी इलायची का पाउडर 
  • आधा टी स्पून सौंफ
  • देसी घी
  • चुटकी भर सोडा़
  • ताजी ठंडी मलाई 
  • दूध 

विधि:
1) बादाम को कई टुकड़ों मे और किशमिश को दो भाग मे कर ले अथवा इलायची को पीस ले । 

2) एक बडे़ बर्तन मे आटा, सूजी, बेसन को डाल कर मिला ले, अब इसमे स्वाद के अनुसार पिसी चीनी, कटे बादाम, किशमिश व इलायची डाले। फिर सूखा ही मिक्स करने के बाद उसमे दूध को थोड़ा थोड़ा करके डालते जाए और पकोडी़ के जैसा घोल तैयार करे। इस घोल को तीन चार मिनट के लिए ढक कर रख दे। 


3) कढ़ाई मे एक चमचा शुद्ध घी डालकर गरम करे, अच्छा गरम हो जाने के बाद गैस हल्की रखे, अब आप घोल मे चुटकी भर सोडा़ डालकर मिला ले और चम्मच की सहायता से घी मे गोल गोल हथेली जितने बडे बनाए एक तरफ से सिक जाने पर काटे छुरी की सहायता से पलटे व गुलाबी होने तक तले (शैलो फ्राई करना है)। 


Hindi Recipe Blog by Amma Ki Rasoi

Hindi Recipe Blog


4) बस हो गया मालपुआ तैयार। 


How to make Malpua and Malai


टिप्स - दूध मे बनने के कारण यह जल्दी खराब नही होते।  तलने मे ज्यादा घी भी नही लगता।  बच्चों को बिस्किट और केक की जगह ये बना कर दे घर की बनी चीज हमेशा शुद्ध होती है। सूजी के कारण काफी समय तक पेट भरा रहता है 

Saturday, 8 February 2020

How to make Bharwan Mirchi | Recipe from Amma Ki Rasoi - भरवा मिर्च

मिर्च का नाम सुनते ही मुंह मे स्वाद आने लगता है, भरवा मिर्च के तो कहने ही क्या हैं।  मिर्च तो आपने अवश्य खाई होगी लेकिन ये मिर्च जिस के बारे में मै बता रही हूँ वह तो मेरे लिए बहुत स्पेशल है, वह इसलिए कि आजकल सब्जी बाजार से हम कुछ ला नही सकते, वायरस के कारण सभी लोग घर मे बंद हैं, बस अपनी समझ से भरवा मिर्च बनाई और खाई, सच मजा आ गया। 


सामग्री:


  • पतली या मोटी मिर्च 
  • उबला हुआ आलू 
  • बारीक कटी हरी मिर्च 
  • एक कद्दू कस की हुई लहसुन
  • धनियां पाउडर 
  • हल्दी 
  • नमक 
  • मिर्च पाउडर 
  • बने/तैयार तेल वाले अचार का मसाला या तैयार अचार
  • सरसो का तेल 

विधि:

1) मिर्च को धोकर साफ कर ले और बीच से लम्बाई मे काटे। 

2) आलू को वारीक कद्दू कस कर ले, इसमे हल्दी, लाल मिर्च पाउडर, बारीक कटी हरी मिर्च और लहसुन व अचार का मसाला डालकर मिला अब आप मसाले को चखकर देखे कि नमक व खट्टा ठीक है या नही, चखने के बाद ही नमक डाले क्योंकि अचार मे नमक रहता है, थोड़ा थोड़ा मसाला ले कर मिर्च भर ले। 


How to make Bharwan Mirchi by Amma Ki Rasoi

How to make Bharwan Mirchi by Amma Ki Rasoi


3) कढ़ाई मे दो चम्मच सरसो का तेल गरम करे और भरी मिर्च को डाल दे, बनते समय मिर्चो को ढकना नही है और गैस हल्की रखनी है जब एक साइड से सिक जाए तो पलट कर दूसरी साइड भी सेक ले।


How to make Bharwan Mirchi by Amma Ki Rasoi

How to make Bharwan Mirchi - Mumbai Hindi Recipe Blog

4) बहुत ही कम तेल व कम समय मे बनकर तैयार हो जाती है, इसे आप रोटी, पराठा, चावल किसी के भी साथ खा सकते है। 


Recipes in Hindi - What to make Lunch


टिप्स - इसमे पानी का स्तेमाल नही है इसलिए जल्दी खराब नही होती ।  घर मे खटाई या नीबू नही है तो क्या हुआ अचार तो है, मैरे पास भी नीबू दो तीन ही थे और वह सब्जी के लिए रखने जरूरी थे इसलिए अचार डालकर बनाए।

Saturday, 1 February 2020

Healthy Recipes - Black Chana & Veggies - सब्जियों के साथ काले चने

काले चने जो बहुत ही स्वादिष्ट लगते है लेकिन कुछ लोग ज्यादा पसंद नहीं करते सच यदि आप इस तरह बनाएंगे तो बड़ो के साथ साथ बच्चे भी खाते समय अपनी ऊंगलियां चाटने लगेंगे |

सामग्री - 
  • ढाई सो ग्राम चने 
  • एक बड़ी प्याज़
  • एक मूली 
  • अदरक 
  • हरी मिर्च 
  • बारीक कटा हरा धनियाँ
  • नीबू 
  • दो टी स्पून तेल या देसी घी
  • चुटकी भर हींग 
  • एक टी स्पून जीरा 
  • दो टेबल स्पून धनियाँ पाउडर 
  • एक टी स्पून लाल मिर्च पाउडर 
  • काला नमक 
  • सफेद नमक जो आप रोज खाने मे स्तेमाल करते है


विधि -


  • रात भर या चार से पांच घंटे चो को पानी मे भिगो कर रखे, चना भीगने पर थोड़ा फूल जाएगा अब आप इसे अच्छे से धो कर कुकर मे डाल दे और एक कटोरी पानी व एक चम्मच नमक डालकर उबलने रख दे (तीन सीटी आने तक उबालना है)

  • टमाटर, हरी मिर्च, अदरक सभी को बारीक कीट ले, मूली को मोटे वाले कद्दूकस से कद्दूकस कर ले 
  • अब आप कढ़ाई ने तेल डालकर गरम करे 
  • इसमे हींग, जीरा, धनियाँ पाउडर, मिर्च पाउडर डालकर भून ले अब उबले हुए चने डालकर मसाले के साथ मिक्स करे और स्वाद के अनुसार नमक डाले
  • सबसे बाद मे हरी मिर्च, अदरक, टमाटर ,मूली व धनियाँ डालकर एक मिनट के लिए चलाए हमे ये सब चीजे पकानी नही है सिर्फ मिक्स करना है


  • नीबू हरी धनियाँ डालकर गरम गरम खाएं 

  • यदि धनियाँ पौदीना की खट्टी चटनी है तो और भी मजा आ जाएगा इसमे चटनी व थोड़ी नमकीन डाले और खाए वाह क्या बात है, खाते ही रह जाओगे 


टिप्स - ये सब चीजे ताजी बनाकर खाने का मजा है, चने के स्वादिष्ट नाश्ते से काफी समय तक पेट भरा रहता है एक बार अवश्य खाए और अपने घर के सदस्यों को खिलाए 

Saturday, 25 January 2020

Healthy Recipes - Oats Besan Bhurji

A lot of us want to eat healthy but often refrain from doing so thinking healthy food is not tasty and is only about boiled vegetables, salads or cutting down carbs. Well, that's not true. There is more to healthy eating provided you also exercise at least 20-30 minutes every day and hydrate yourself with at least 2L of water. Starting today, I will share a few recipes on my blog which my daughter is following currently, thanks to her fitness coach - Helius Fitness. 


First up - Oats and Besan Bhurji
(serves 04, total time to prep and cook: 40 minutes)

Here's what you will need:
For the batter - 
  • 3/4 cup Besan
  • 1/2 cup plain Oats
  • 1 tbsp Flax seed powder (we did not use it while cooking but you can)
  • 2 tbsp curd
  • 1/2 cup water
For the vegetables mix -
  • 1 tsp cumin seeds
  • 1 onion (finely chopped)
  • 1 cup button mushrooms (sliced) - this is optional in case you are not a mushroom fan, you add diced cottage cheese
  • 1 capsicum (finely chopped)
  • 2 green chillies (finely chopped)
  • 1/4 tsp Turmeric powder
  • 1 tsp red chillie powder
  • 1 tsp cumin powder
  • Salt, to taste
  • Coriander leaves (finely chopped for garnishing) &
  • 1 tsp Oil (you can even use desi ghee)

Moving on to the procedure -
1) Mix the ingredients for the batter - make sure that the consistency is thick and not runny.


2) Heat the oil in a non stick frying pan/skillet, splutter cumin seeds and fry the onion until it becomes translucent.


3) Then add in the other vegetables along with green chillies, spices and stir until the mixture is cooked.


4) Shake and make sure the mixture is evenly placed, and then, slowly pour the batter onto it, covering all the vegetables. Heat it on a slow flame for about 5 minutes.


5) As the batter cooks, stir it slowly, until it becomes golden. 


6) Now add salt, coriander leaves and serve hot with toast. 


Pro tip: You can even serve it with coriander chutney and plain curd if the Bhurji seems dry. (it also adds to the taste of it!) Plus, curd is healthy, you can let go off the toast ;)

Do try this and let us know how it turns out in the comments section below.

Do note: This is not our original recipe and belongs to Helius Fitness.